How was this photo taken?
There are pictures that you taken when you are there at the right time and bingo the shot is taken . There are other shots that are taken where a lot of planning and thought has gone into the shot.
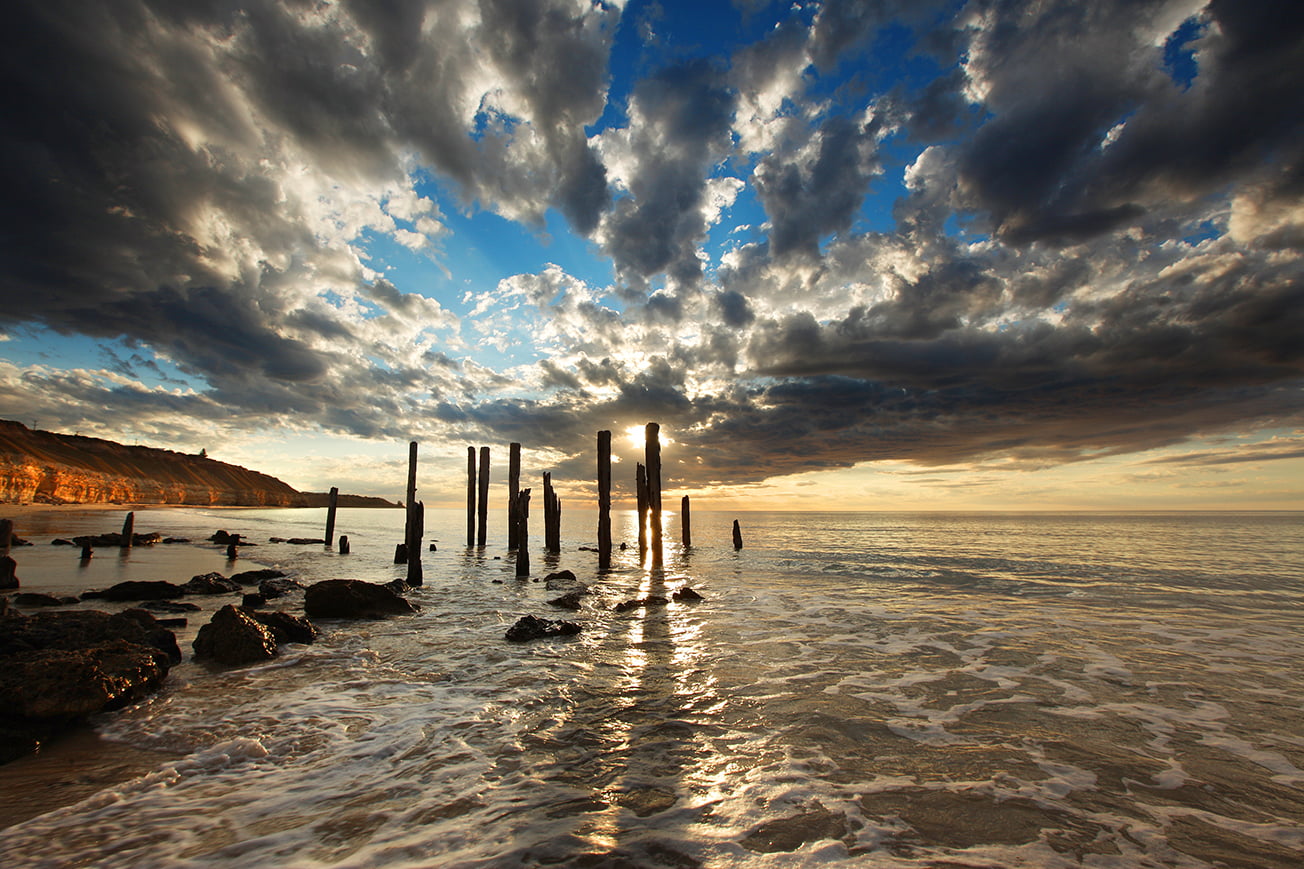
This shot is one shot where thought and planning went into the shot before it was taken. This image is one capture , it is not two images combined as so often happens these days. This was taken in camera, one click and one image. So how was the shot taken?
Clearly taking a picture into the sun like this is going to throw the exposure right out and the camera is going to struggle unless it gets a little bit of help.Umm what would that help be.? Any guesses?
This is a very popular area to go to to take pictures of the iconic Port Willunga Jetty- well what is left of it. This shot was taken in summer and this is a deliberate time of year to take this shot as the sun does not set on this angle in winter. I wanted the sun to set behind the sticks and so I waited for the right time of year and I waited for the to sun to fall behind the huge sticks.The reason for that is I also wanted the long shadows of the sticks which would be my lead in lines to the main subject.
It is so important where possible to have lead in lines to the main subject as they draw the viewer to the main subject and it makes it more engaging and more emotive for the shot. Lead in lines I cannot stress this enough.Take the time to look for them and when you get use to it, there are usually lines around to explore and they will draw you to the main subject.
This was taken with a 3 stop ND graduated filer. I use the Lee systems. They are not cheap but they are very effective. What you pay for is what you get in this case.There are other systems that you can use. I find the very cheap versions that you can use have too much of a colour cast going across the image and although color temperature can easily be fixed in lightroom or photoshop I tried and get most correct as I can in camera.
I took my light reading of the water and then I took the light reading from the sky and it worked out it was a 3 stop difference due to the sun. You expose for the foreground, slip the 3 stop in front of the lens and bingo you have your image.
Both photoshop and lightroom have built in ND Graduated filers and they do work very well but where I can I like to try and get things right in camera as it saves time in post work and I’m all for saving time.
I never spend more than 90 seconds on any image when editing.:)

